Viking Embroidery Design: A Designer’s Test & Verdict
Every time a new machine embroidery design lands on my worktable, I ask one question: would I actually stitch this onto something I’d sell, gift, or wear in public? With the Viking file set, the answer came faster than expected. This isn’t a generic shield-and-horn motif. It carries a certain weight—part historical grit, part clean decorative structure—that immediately sparks ideas for handmade apparel and boutique merchandise. If you run a small shop, sell on Etsy, or just obsess over stitch quality, let me walk you through what really matters before you commit thread to fabric.
First Glance: Viking Boldness Hits the Hoop
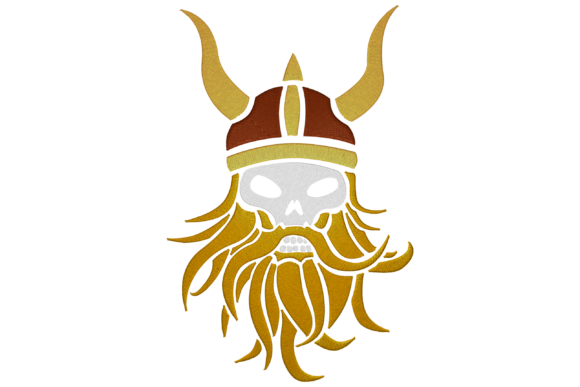
Opening the Viking embroidery design folder, I saw a graphic built around a central warrior profile—strong, angular, and distinctly silhouette-driven. The shape reads well even as a thumbnail, which is exactly what you want for custom apparel and personalized gifts. There’s enough detail to feel intentional, but not so much that it becomes a muddy mess on textured fabric. A balanced mix of satin stitch outlines and fill stitch sections gives the beard, helmet, and shoulder elements solid visual weight, while a lighter running stitch handles finer contour lines. Right away I pictured this on a heavyweight sweatshirt, on the back of a denim jacket, or centered on a canvas tote. The mood leans into the Military category—fierce, stoic, a nod to warrior heritage—but it’s also adaptable to heritage-inspired streetwear or rugged outdoor gear.
Stitching Out the Design: Real Thread, Real Talk
I loaded the medium size onto a test hoop and stitched it on a mid-weight cotton twill—similar to what I’d use for an embroidered patch or structured cap panel. The digitizing impressed me: stitch density felt consistent, without puckering, even in the detailed helmet area. If you’ve fought with designs that turn horn tips into thread blobs, you’ll appreciate that the points here stayed crisp. I did notice the very smallest size would lose some beard detail on a fluffy towel or fleece, but that’s typical—not a design flaw. For any machine embroidery design that plays with tight corners, test first on a scrap of your actual product fabric. I used a medium-weight cutaway stabilizer, which held everything flat even after pulling the hoop. On a thin T-shirt, I’d step up to a no-show mesh to prevent stiffness, but the stitchout itself transferred cleanly.
Where This Design Earns Its Keep
After a few test runs, I know exactly where Viking will pay off. Here’s my go-list for real embroidery projects:
- Sweatshirts and hoodies – The strong silhouette pops against fleece, and the larger sizes fill a chest or back panel without feeling sparse.
- Tote bags – Cotton canvas handles the fill stitch well, and the design turns a basic bag into a handmade product that feels boutique-ready.
- Denim jackets – The theme clicks with edgy, Norse-inspired streetwear. Use a contrasting thread color for extra punch.
- Patches – Stitch on felt or twill, add a merrow border, and you have a killer sew-on or iron-on patch for Etsy listings.
- Aprons – A dark canvas apron with this design in metallic or stone-gray thread sells itself at craft fairs.
- Nursery decor – Sounds surprising, but a softened color palette on a blanket or pillow cover gives a mythic, bedtime-story feel.
Each use case shares a common thread: the design’s visual personality lifts the product from “printed” to “crafted.” That matters for brand consistency and buyer trust. When your finished product shows clean stitch lines and a design that doesn’t warp after washing, customers notice.
Choosing the Right Colors and Fabric
I tested Viking on both light heather gray and black fabric. On lighter grounds, the default thread color suggestions (charcoal, rust, copper) gave a worn-metal look. Against black, I shifted to silver and gold tones—instantly more ceremonial. There’s no rule here, but if you’re a creative entrepreneur planning multiple listings, I’d stitch one sample in monochrome and another with subtle metallic accents. That subtle shift can double your product line without extra design work.
Fabric texture deserves honest talk. A smooth, stable weave like bull denim, twill, or medium cotton shows every stitch. Towels and loosely knitted sweaters eat up fine detail; for those, stick to the larger hoop sizes and accept that tiny helmet rivets will soften. Stretchy fabrics like performance tees demand a fusible backing and possibly a water-soluble topper to keep stitches from sinking. If you’re offering this on custom apparel for babies or kids, I’d choose the second-smallest size for a onesie but absolutely test one first—baby rib knit can be unforgiving.
Hoop Sizes and Scale: Six Options, One Sweet Spot
The Viking embroidery design comes in six sizes, which practically means you can stitch it from a tiny hat patch up to a full-back jacket centerpiece. My sweet spot for most business items was the 4x4 and 5x7 inch range—large enough to see facial detail, small enough to fit a pocket, sleeve, or tote panel. For a tall cap front, the design’s vertical orientation works well, but measure your cap hoop clearance first. Curved surfaces can push stitches out of alignment if you don’t tape the bill and use a cap frame correctly.
Digital Files and Workflow: What to Expect
Because Viking is a digital embroidery file, you’ll find common machine formats inside—it’s built to play nice with most multi-needle and single-needle setups. You’re not locked into one software suite. Before loading onto your machine, I recommend opening the file in your embroidery editor to confirm hoop size fit and check color stops. Nothing hurts more than a thread change mid-stitch that you forgot to mark. If you’re combining this design with text for a personalized gift, verify placement with a printout or digital mockup. Printable mockup practice saves wasted blanks, especially when testing on dark fabrics.
When to Hold Back: Tricky Spots and Smart Cautions
Even a solid machine embroidery design has its limits. For Viking, keep these cautions in your back pocket:
- Smallest size on textured fabric – The beard lines and helmet filigree might bridge or blur. Reserve the tiny version for flat, tight-weave fabric.
- Dense stitch areas – The solid fill sections are well-digitized, but layering this over a seam or zipper could break needles. Always hoop so the design sits on a single fabric layer.
- Curved items – Water bottles sleeves, neck gaiters, or slim stockings distort vertical designs. Stick to flat or gently curved placements.
- Frequent washing – For high-wash items like gym bags or kids’ clothes, secure the back of the stitching with a soft cover stitch or iron-on backing to prevent snagging.
- Thin lettering – If you pair this design with a name or date, avoid fonts thinner than 0.25 inches. The Viking theme deserves bold companion text.
From Screen to Shop: Making Viking Work for Business
Let’s get practical for sellers. A customer recently asked me for a personalized gift—a zip-up hoodie with a Norse-inspired emblem for her husband’s birthday. I stitched Viking on the back panel in antique gold thread against navy fleece. The result looked like a premium boutique product, not a quick heat-press grab. She immediately ordered two more for friends. That’s the power of a design asset that holds its own visually and wears well.
If you’re stocking an Etsy shop, this design works for custom apparel, ready-to-ship sweatshirts, or DIY kit bundles. Because the Viking file set includes multiple formats and six sizes, you can create a cohesive collection—matching beanie, tote, and patch sets feel intentional. Use mockup photos that show the stitching texture up close. Buyers respond to that handmade proof.
On the licensing side, always double-check the terms for commercial embroidery use. Most digital design purchases allow you to sell finished physical items, but not to resell the digital file itself. If you’re printing heat-transfer mockups for printable mockup sets, that’s a different permission tier—clarify before posting.
Stitch-Out Notes for the Detail-Obsessed
I keep a running list for every embroidery file I plan to reuse. Here’s my paper-trail for Viking:
- Use a 75/11 sharp needle for woven fabric; ballpoint for stretch knits.
- Thread tension: slightly reduce top tension by 0.2 if metallic thread drags.
- Stabilizer: cutaway medium (2.5 oz) for garments; tear-away plus fusible for patches.
- Thread colors: keep a palette card—copper, charcoal, pewter, deep red, and olive all work and align with the Military undertone.
- Clean-up: trim jump stitches immediately after stitchout; those tiny horn points need it.
The Final-Verification Checklist
Before you load Viking into a customer order or batch production, run through this checklist born from too many late nights unpicking mistakes:
- Test the design on the exact fabric and color you’ll sell.
- Stitch a black-on-black and white-on-white sample to check contrast limits.
- Wash one finished piece three times to see how edges wear.
- Check the smallest size for beard clarity—accept what gets lost.
- Verify hoop size compatibility with your machine; the six sizes help, but measure don’t guess.
- Keep a stitch-out file for future reorders—label it with thread colors and stabilizer used.
Viking isn’t a design you babysit. Once dialed in, it delivers a confident, story-rich look that appeals to buyers seeking something beyond generic florals or initials. For craft business owners, that means higher perceived value and fewer “do you have something different?” questions. Stitch it on a heavyweight tote, picture it on your next pop-up shop table, and trust your thread.
Whether you’re creating an embroidered patch for a motorcycle club, a sweatshirt embroidery line for a streetwear brand, or a single personalized gift for a history buff, this digital embroidery file earns its place in your library. Treat the test run seriously, respect the fabric, and you’ll have a design that stitches as strong as the warriors it depicts.